443-287-4832

Menu
Specimen Collection for a Community-Based Serosurvey


Introduction

Laboratory testing for biomarkers requires standardized techniques for specimen collection and processing, high quality testing assays, and meticulous procedures for data management and analysis. Specimens can be venous blood, capillary blood obtained through a finger or heel prick, and oral fluid or saliva.

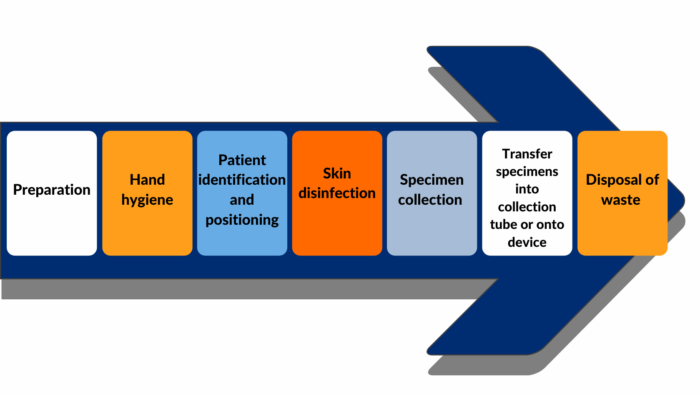
This module describes the procedures for collecting high quality blood specimens in the community and transporting specimens to the laboratory. This includes considerations for all the steps of blood collection, as depicted in Figure 1.

Learning Objectives
To collect high quality blood specimens in the community and transport to the laboratory

Topics covered in this module
Technical and logistical demands of collecting, processing, and storing a blood specimen in the community and transporting the specimen to the laboratory.

Note: Refer to the below modules for related information


Specimen Collection: Preparation

Getting Started

The goal of this module is to prepare you prior to starting a study and guide you through the steps from collecting a blood specimen in the community to transporting specimens to the laboratory.

  • Although there are other specimen types, this module will focus on collecting blood specimens (refer to Study Design module).

Primary considerations:

  • The laboratory should have all equipment and supplies in place before the start of the work, especially supplies for blood collection
  • All survey and laboratory staff should be fully trained in required specimen-related procedures before the start of the study

Standard operating procedures (SOPs) are step-by-step instructions to guide staff and ensure consistency.


Assess Laboratory Assets and Capacity

When planning a serosurvey, assess the laboratory equipment, personnel training and capacity prior to starting community-based activities.

Assessment of laboratory assets and capacity is necessary because the technical and logistical demands of a serosurvey can be substantial, and laboratories not familiar with serosurveys may not have the training or equipment necessary to process the volume of specimens, store the specimens, or perform the assay (e.g., enzyme immunoassay or plaque reduction neutralization assay).

  • During the planning phase assess any laboratories that may be involved in the serosurvey with regards to equipment, personnel training, and capacity.

A serosurvey may require two levels of laboratories:

  • Local laboratory to receive specimens from survey teams, process specimens (e.g. centrifugation of whole blood), and short-term storage at the appropriate temperature until shipment to the central laboratory.
  • Central laboratory to perform serologic testing and quality control procedures, report results to central data management and statistical team, and long-term storage of frozen specimens.

A pre-survey assessment is used:

  • To assess lab processing, sample storage, testing and electronic data management and storage capacities at local and central levels.
  • To establish a protocol and plan to rectify deficiencies in capacity, by:
    • Expanding current lab infrastructure to meet serosurvey demands.
      -OR-
    • Out-source testing to facilities (private or public) with the capacity to perform the necessary protocols.
Considerations when conducting a pre-survey lab assessment can include:
  • The laboratory’s capacity to handle the number of specimens.
  • The experience and training of the laboratory staff.
  • Specimen processing and storage facilities (both type and capacity), including back-up power sources in case of electricity outages.
  • Necessary equipment, including plate readers and washers for enzyme immunoassays.
  • Electronic data management system.
  • Accreditation status.
  • If local laboratories will be storing specimens then shipping to a central laboratory for testing, consider the following:
    • Sample storage needs (e.g., cold packs, mobile refrigeration units).
    • Storage space availability (e.g., number of freezer boxes that can fit in the -20 C freezer).
    • Availability of regular power supply.
    • Shipment frequency (e.g., weekly, monthly).
    • Number of samples to be shipped in each shipment.
    • Type of sample shipped (whole blood, serum aliquots, etc.).

The assessment of laboratory capacity should be critically evaluated to determine deficiencies and possible means of remedying them.

Refer to the Site Equipment Assessment and Specimen Storage Plan as example tools to use for assessing capacity and developing procedures.

Preparation & Labeling

When planning a serosurvey it is key to determine the type and number of supplies and specimen labels required prior to starting community-based activities.

The following information and documents are required to guide preparation for blood specimen collection to ensure adequate supplies and labels exist prior to going into the community:

  1. The number of specimens anticipated, both overall and at each survey site
  2. SOPs for specimen labeling, specimen collection and transport in the community, and specimen processing, shipment and storage

Draft a Supply List for specimen collection at each survey site and tally the supply inventory required based on the number of specimens anticipated and number of survey teams hired.

Pre-print labels with unique identifiers for each subject to expedite specimen collection and reduce potential errors

  • The labels should be prepared by a central team or site coordinator and provided to the survey teams.
  • If labels will be used on cryovials, ensure the labels are designed to be used in the freezer (-20 to -80 °C), are waterproof, and able to withstand freeze-thaw cycles.
  • Sufficient number of labels should be printed to account for the number of specimen collection tubes, storage vials, consent forms, and lab registers needed during collection, storage, and processing.
  • Refer to the Specimen Labeling SOP and Labeling Instructions and template.
Figure 1. Example of a pre-printed label with the participant ID. Separate labels are created for each purpose, such as the consent form, the specimen collection tube, the freezer aliquots, and the laboratory register.

Obtaining Supplies and Train Staff

Once the plans are set for the serosurvey procedures and required supplies, the next step is to obtain supplies and train staff.

  • Supply acquisition should be guided by the inventory list produced in the planning stage. Depending on the survey, supplies may be purchased by the central laboratory and sent to the sites.
  • All supplies, including those required for cold-chain procedures and shipping, should be obtained prior to collecting specimens in the community.
  • Survey and laboratory staff should be trained in how to use all supplies and equipment and trained on collection & processing procedures prior to collecting specimens.
  • We recommend training should include:
  • Well-trained and confident specimen collection staff is key to building trust with participant, reducing refusals, and improving quality of specimens.

Specimen Collection: Procedures

Figure 2. Overview of blood collection procedures

When developing procedures for specimen collection and transport consider how each step may impact specimen quality. Design procedures to prevent degradation and preserve antibodies.

Safety of the survey staff and the survey participant are top priority, and procedures should be developed with this in mind.

Protocols for specimen collection will differ depending on the specimen collection method and specimen type.

Venepuncture: Collection of whole blood from veins into tubes. Can then be separated into sera or spotted onto dried blood spot cards.

Finger or heel prick: Collection of whole blood from a finger or the heel using microlancets. Heel pricks are often used in infants. Typically used for dried blood spots but also can be used collect liquid capillary blood in tubes.

Mouth swab: Collection of oral fluid or saliva on a cotton swab in the mouth. (Not included in these modules)

Figure 3. Set-up of supplies at household location

  • May be required if participants in the serosurvey are not willing or comfortable going to a central location.
  • Requires set-up and clean-up in every house (Figure 2).
  • It is important to consider how to ensure confidentiality if being seen in the house collecting blood and how to ensure privacy in the house from other members of the household.

Figure 4. Set-up of supplies at central blood collection point

  • Requires participants to travel to central location.
  • Allows for single set-up of blood collection materials (Figure 3).
  • It is important to identify a location with adequate space, ideally with separate areas for consent, waiting, and specimen collection.
  • Also important for the team to develop a system and define roles (e.g., who will bring families to the central location and control flow of people; who will verify identity and obtain consent).

Regardless of specimen type the SOP should include information and guidance on the following aspects

  • Checklist of supplies required for each day of specimen collection (e.g., 50 tubes, 50 gauze pads, 3 tourniquets).
  • Choosing an appropriate location for specimen collection based on study context (e.g., household, local health facility, school or other public setting).
  • Verifying the participant’s identification and confirm eligibility and informed consent and/or assent has been obtained from the participant.
  • Locating the correct specimen label for the participant and properly labeling all specimens with identification and date collected.
  • Proper hand hygiene techniques for the specimen collector.
  • Proper technique and procedures for collecting the specimen from the participant (will vary depending on the specimen collection method).
  • Proper completion of all required documentation and data entry.
  • Cleaning up and concluding the collection interaction with the participant.
  • Proper disposal of biospecimen waste.
  • Guidance on infection prevention and control.
  • Transportation of the specimens from the community to the local laboratory.

Refer to the following examples and references at the bottom related to specimen collection:

  • Requires hiring trained phlebotomists to collect venous blood specimens.
  • A maximum volume of blood to be collected should be pre-specified by the investigators and followed by phlebotomists throughout the survey.
  • Butterfly needles (versus needle and syringe) may be easier to use when collecting blood from young children but should only be considered for use with experienced laboratory technicians.
  • The hemolysis of blood specimens may lead to less reliable laboratory results. Survey teams should take steps to avoid hemolysis of the sample (see Common Issues section).

Hemolysis: destruction of red blood cells within the sample leading to release of hemoglobin.

Figure 5: Venous specimens placed in a tube rack to clot after collection.
Figure 6. Vacutainer tubes secured in a beaker with cotton inside a vaccine carrier for transport from the community to the laboratory
Figure 7. Blood specimen with evidence of hemolysis following centrifugation. The sera layered above the red blood cells (at the bottom of tube) is pink in color, suggesting the specimen hemolyzed during or after collection.”)
  • Dried blood spots (DBS) usually do not require a phlebotomist because the blood specimen can be collected from a finger or heel prick directly onto the paper card or device but do require trained personnel to correctly spot onto cards (Figure 7).
  • Filter paper cards or devices (e.g. Whatman 903 Protein Saver filter cards, TropBio cards, HemaSpot HF device) are used to collect blood spots that are later processed to obtain a blood sample for testing.
  • Spot whole blood on each designated circle (may vary depending on DBS device used) (Figure 8).
  • Immediately following collection, place the sample on a drying rack to dry for 20 to 30 minutes before placing the sample in an individually labelled Ziploc or sealed bag with a desiccant pack.
    • Specific requirements for drying and storage while in the community may vary depending on the device.
  • The biggest risks to the quality of a blood spot specimen are contamination and variability in specimen volume.
Figure 8. DBS finger prick blood collection
Figure 9. DBS collection on Whatman 903 card. Top card shows 100% filled for spots 1-4 and 75-99% filled for spot 5. Bottom card shows <50% filled for all spots.

Common Issues with Specimen Collection

Issue Venous specimens DBS specimens Ways to prevent
Mislabeling X X
  • Using pre-printed labels to avoid issues hand-writing IDs
  • Re-confirming participant ID at time of specimen. collection and verifying label on specimen tube/device
  • Using additional staff member to assist with labelling and verification while technician focuses on specimen collection.
Contamination X X
  • Perform hand hygiene and put on gloves (use a new pair for each participant).
  • Clean site of with 80% alcohol swab and allow to dry. Do not touch the site or palpate the vein, this will increase risk of contamination. If touched, disinfect again.
Hemolysis X
  • Avoid or minimize movement to the tube after collection.
  • Gently transfer the sample from the syringe to the collection tube; do not force blood through the needle.
  • Prevent the specimens from freezing when placed in the vaccine carrier:
    • Allow ice packs to stand at room temperature briefly prior to placing in the vaccine carrier.
    • Pack specimens to avoid direct contact with ice packs. For example, place a beaker inside the vaccine carrier and secure specimens inside the beaker with cotton, or tightly pack the tubes inside the vaccine carrier with a cloth (in the absence of a beaker).
  • Centrifuge the sample before transportation to the laboratory (e.g., at a local health facility) when possible to prevent hemolysis during transport, especially in areas with poor quality roads.
Underfilled DBS X
  • If spotting directly from finger, allow full drop of blood to form and drip onto the filter paper.
  • If insufficient blood flow, ask participant to rub hands together before pricking another finger.
  • Fill the rings of each circle completely and avoid touching the device with the participants’ finger.
  • Avoid placing multiple small drops in order to fill the circle which may overfill circle and affect volume.
Safety X X
  • Use of a retractable needle or lancet, or safety needle with a needle cover is preferred if available, but all non-retractable needles should be cut off at the end of the procedure rather than recapped.
  • Discard the used needle and syringe or blood-sampling device into a puncture-resistant container.
  • Discard sharps and broken glass into the sharps container. Place items that can drip blood or body fluids into infectious waste.
Adverse events for participant X X
  • Properly locate site of puncture to reduce risk of pain and hematoma. For DBS this may be selecting 3rd or 4th finger on non-dominant hand. Never select thumb or 5th finger (pinky or little finger.
  • Ensure person is properly positioned (i.e., small child restrained by a parent).
  • Monitor participant for a few minutes after collection.

References:

Laboratory Assessment
Laboratory quality management system training toolkit

Manual for the Laboratory-based Surveillance of Measles, Rubella, and Congenital Rubella Syndrome

Blood Collection and Infection Prevention and Control References

WHO Guidelines on Drawing Blood : best practices in phlebotomy

  • Section 2.2.3: Procedure for drawing blood
  • Section 2.3 Illustrations for best practices in phlebotomy
  • Section 3.2 Practical guidance on blood-sampling systems
  • Section 6 Pediatric and neonatal blood sampling
  • Section 7 Capillary sampling
  • Annex B Infection prevention and control, safety equipment and best practice
  • Annex E Training course content for phlebotomists
  • Annex F Explaining the procedure to a patient
  • Annex G Disassembly of needle from syringe
  • Annex H Blood spillage

WHO: How to safely collect blood samples from persons suspected to be infected with highly infectious blood-borne pathogens (picture guide)

WHO: Guidelines for the collection of clinical specimens during field investigation of outbreaks

  • Section 2 Specimen collection and processing
  • Annex 2: blood sample collection
  • Annex 10: first aid procedures after accidental exposure to infectious materials
  • Annex 13: basic triple packaging and temp maintenance during transport

IPC-CDC Guidelines
IPC – Standard Precautions (Wisconsin Dept Health Services)


Toolkit

Section Toolkit material Context
Preparation Site Equipment Assessment Form Assessment for district-level laboratory for a serosurvey collecting venous samples
Preparation Site Specimen Storage Plan Specimen storage plan for district-level laboratory for a serosurvey collecting venous samples
Preparation Supply List Serosurvey with venous blood specimens
Preparation Specimen Labeling SOP Serosurvey with venous blood specimens (also relevant for DBS specimens)
Preparation Instructions for creating pre-printed labels Serosurvey with venous blood specimens (also relevant for DBS specimens)
Preparation Excel file template for creating pre-printed labels Serosurvey with venous blood specimens (also relevant for DBS specimens)
Specimen Collection Specimen Collection SOP Serosurvey with venous blood specimens (also relevant for DBS specimens)
Specimen Collection DBS Specimen Collection SOP Nested serosurvey with DBS specimens (Whatman 903 card)
Specimen Collection Specimen Collection Training Slides Serosurvey with venous blood specimens (also relevant for DBS specimens)